The example deployment
This recipe uses Server 0.4.1 and Caddy on Ubuntu/Debian, on the same reachable host. It assumes you control the host, its firewall and a domain. It is a configuration example; the documentation capture did not publish a live public service.
Replace agent.example.com and 203.0.113.10 with your own service domain and host IP. They are reserved examples. Do not reuse the Rovai website’s domain or change its DNS to follow this tutorial.
Desktop 0.4.1 lacks a public-origin field in its settings. Use the Server installation for this recipe. Use the root of a dedicated hostname; serving Rovai under /rovai/ is not this configuration.
Public address versus backend address
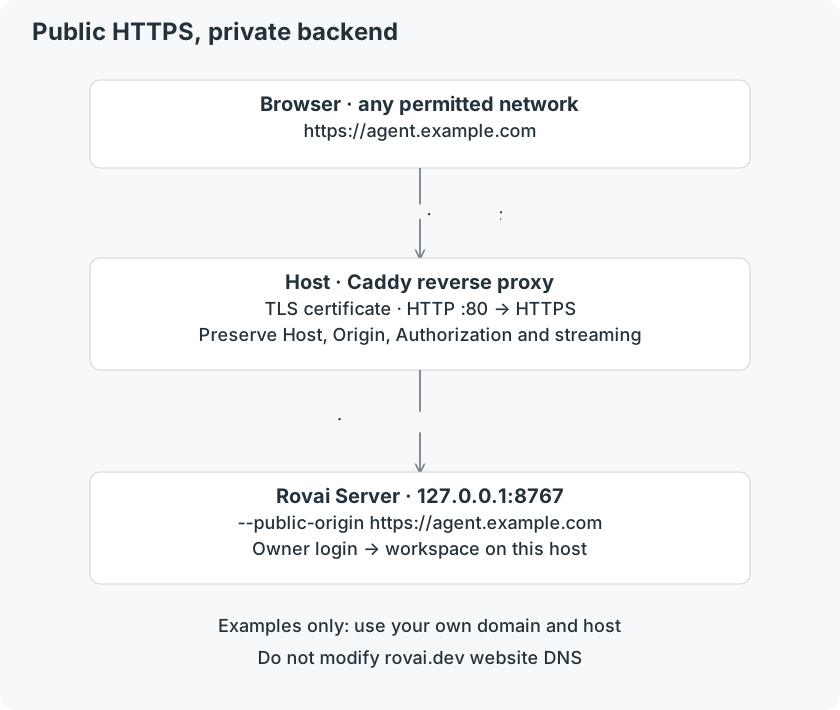
Prepare DNS and network access
- Create an A record for your service hostname pointing to the reachable host IPv4 address. Add AAAA only if IPv6 actually reaches the same proxy; an incorrect AAAA can break access and certificate validation.
- Permit inbound TCP 80 and 443 to Caddy in the provider firewall and host firewall. Port 80 supports HTTP redirection and certificate issuance. If the host sits behind NAT, it needs a valid reachable ingress; CGNAT may prevent direct hosting.
- Keep TCP 8767 closed to the public Internet. The proxy and Server in this example share a machine, so the backend can remain at 127.0.0.1.
- Ensure no other application is already using 80/443. On a host with existing sites, add only this site’s configuration and preserve the other sites.
Install Caddy · Ubuntu / Debian
sudo apt install -y debian-keyring debian-archive-keyring apt-transport-https curl
curl -1sLf 'https://dl.cloudsmith.io/public/caddy/stable/gpg.key' | sudo gpg --dearmor -o /usr/share/keyrings/caddy-stable-archive-keyring.gpg
curl -1sLf 'https://dl.cloudsmith.io/public/caddy/stable/debian.deb.txt' | sudo tee /etc/apt/sources.list.d/caddy-stable.list
sudo chmod o+r /usr/share/keyrings/caddy-stable-archive-keyring.gpg
sudo chmod o+r /etc/apt/sources.list.d/caddy-stable.list
sudo apt update
sudo apt install caddyUse the official package procedure
These commands follow Caddy’s Debian/Ubuntu package instructions. Review them before applying them to your host; the package creates a systemd service. If Caddy is already installed, use its existing installation and configuration.
Caddy installation reference
Start the private backend
rovai-server --data-dir "$HOME/.rovai-server" \
  --listen 127.0.0.1:8767 \
--public-origin https://agent.example.comSet the same external origin
Stop the old Server process before starting with new flags. Preserve the original --data-dir. --public-origin must match what the browser opens, including https and any non-default port. It does not change the listening socket or obtain a certificate.
Run Server as the ordinary account that owns its Agent environment. Caddy runs separately. For a persistent Server process, adapt the service template in Sign-in and maintenance and add this --public-origin argument.
Add this site to /etc/caddy/Caddyfile
agent.example.com {
    reverse_proxy 127.0.0.1:8767 {
        flush_interval -1
    }
}Preserve authentication and live responses
Use HTTP to the loopback backend and HTTPS at the public entrance. This configuration leaves the original Host, Origin and Authorization headers intact and disables response buffering for prompt live delivery. Do not cache authenticated API responses.
Do not rewrite Host to 127.0.0.1, remove Origin/Authorization, disable Rovai login or route only the HTML page. Proxy the whole root so APIs and live event responses use the same origin. Caddy obtains and renews the public certificate when DNS and reachability requirements are met.
Validate and reload
sudo caddy validate --config /etc/caddy/Caddyfile --adapter caddyfile
sudo systemctl reload caddy
sudo systemctl status caddy --no-pagerLog in from another network
- Open https://agent.example.com/ in a normal browser after the certificate is ready. If the browser reports a certificate error, fix DNS, certificate issuance or the hostname; do not bypass its warning.
- Enter the Token from the Server data directory. Open a conversation and inspect its latest execution. Send a small request only after confirming the host and project.
- If the HTML opens but login/live updates fail, check the matching public origin and proxy headers. For 502 responses, confirm Server is running on the configured loopback port.
- Read Caddy’s service log with journalctl -u caddy and Server’s own logs/server.log. Keep tokens and request details out of shared diagnostics.
Close the public entrance
- Remove only the agent.example.com site block you added. Validate and reload Caddy; leave unrelated sites running.
- Remove the corresponding service DNS record and any dedicated firewall/NAT rule you created when no longer needed. DNS deletion alone may be delayed by caches; remove the proxy route first.
- Stop Server as well if the host should stop processing work. Removing the proxy entrance by itself does not stop an already accepted Run.